User Metrics Onboarding
Background Info
We add clients to our Internal Usage Metrics Dashboard.
Here we can track how many times, who, when and what report the client views for each employee.
Process Overview (6 Steps)
-
Set up an app on Entra ID
-
Create a client secret
-
Get a refresh token
-
Add the client to the config table
-
Add credentials to Key Vault
-
Add the tenant to DimTenant
Step 1: Set Up the App on Entra ID
You need to create an app registration on the client's Entra ID tenant to enable access to their Power BI activities.
Requirements:
- Ensure you have the necessary rights in the client's Entra ID (Application Developer role)
- If you lack these permissions, request them from the client's IT department, or ask them to set up the app themselves
Instructions:
-
Navigate to: https://entra.microsoft.com/
-
Go to App registrations and select New registration
-
Enter the following details:
- App name: xxx-pwrp-direct (replace xxx with the client code)
- Account type: Single tenant
- Redirect URI (web): https://localhost:44300/
-
Once created, add the following permissions:
- Azure Service Management
- user_impersonation
- Microsoft Graph
- User.Read
- Power BI Service
- App.Read.All
- Capacity.Read.All
- Dashboard.Read.All
- Dataflow.Read.All
- Dataset.Read.All
- Report.Read.All
- Tenant.Read.All
- Azure Service Management
Request the client's IT partner to grant admin consent for these permissions. Once the app is created and permissions are granted, proceed to Step 2.
The next steps are more technical but documented. If help is needed contact Brend or Christoph
Step 2: Create a Client Secret
Now that the app is set up, you need to create a client secret. Only proceed with this step if the permissions have been granted.
Instructions:
-
Navigate to the app you created in Step 1
-
Go to Certificates & secrets
-
Select New client secret
-
Enter the following details:
- Description: pwrp-pbi-direct
- Expires: 720 days
-
Copy the secret value immediately (you won't be able to see it again)
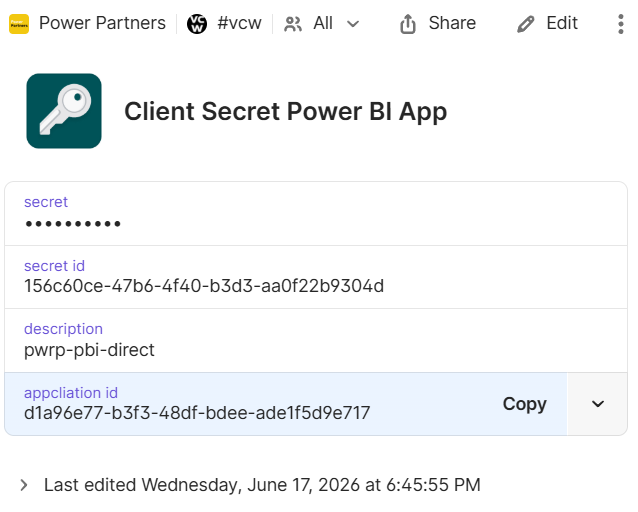
Store in 1Password:
-
Open 1Password and navigate to the client's vault
-
Create a new item titled Client Secret Power BI App
-
Add the following information:
- Secret value
- Secret ID
- Description
- Application ID
Step 3: Get a Refresh Token
Now you need to get a refresh token for the app you created.
Instructions:
-
Use Postman to generate a refresh token for the app
-
Follow the internal documentation for the process pbi-proxy-refresh-token
Important:
Only one refresh token is required per client (not an embed token)
Store this refresh token securely, you need it in Step 5.
Step 4: Add Client to the Config Table
Now that you have all the necessary information, add the client to the config table in Azure DataStudio.
Instructions:

-
Open Azure DataStudio
-
Navigate to the config table: config.usage_metrics
-
Add a new entry with the following details:
- Tenant_id: (from Entra ID app registration)
- Client_name: (xxx)
- Activities: ViewActivity
- active: 1
- mode: direct
- app_id: (from Entra ID app registration)
Step 5: Add Credentials to Key Vault
Add the client secret and refresh token to Azure Key Vault for secure storage.
Instructions:
-
Navigate to the Azure Key Vault: Pwrp-pwrp-um-kv on our tenant
-
Add two new secrets using the following naming convention (replace xxx with the client code):
- Secret 1:
- Name: xxx-um-secret
- Value: (client secret from 1Password)
- Secret 2:
- Name: xxx-um-refresh-token
- Value: (refresh token from Step 3)
- Secret 1:
Step 6: Add Tenant to DimTenant
Finally, add the tenant information to the DimTenant query in Power BI.
Instructions:

-
Open the User Metrics dataset in Power BI
-
Navigate to Power Query
-
Find the query for DimTenant
-
Locate the step titled Add tenantname
-
Add the following information:
- Tenant ID: (paste the client's Entra ID tenant ID)
- Company Code: (xxx)
Client added
Once all six steps are complete, the client is fully set up in the User Metrics Dashboard.
When the scheduled function runs next, client data will be automatically added to the dataset.